Makerbot Replicator 2X - The Unofficial Manual
DataPro
Login | Catalog | Contact | Support | Tech Info

CART Cart
 
DataPro International Inc.

Makerbot Replicator 2X - The Unofficial Manual

DataPro Tech Info > Makerbot Replicator 2X - The Unofficial Manual

This unofficial manual was written by a member of our staff in 2014, as a kind of supplement for anyone in the office wanting to play with our new Makerbot Replicator 2X. It should not be used as your sole instruction manual, and may be a little out of date in places.
We use our 3D printer to prototype parts, and can produce CNC milled and injection molded final products in single units, or we can scale up to full production runs. For more information about our capabilities, see our Custom Wallplates, Custom Panels, and Custom Cable pages!.

What is 3D Printing?

3D printing is a manufacturing process in which 3D models developed on a computer are built up, layer by layer, by a machine using one of several additive processes. There are three primary additive processes right now: FDM (Fused Deposition Modeling), SLS (Selective Laser Sintering), and SLA (Stereolithography). Each process has its own benefits and drawbacks, but the machine we chose to start with, a Makerbot Replicator 2X, is an FDM machine that can print in ABS plastic (the same material used for LEGO) and PLA (a biodegradable starch-based plastic). FDM machines pull their print material into the extrusion head in the form of a filament, melt a small amount, and deposit it on the build platform.

The Replicator 2X

Our 3D printer is a hobbyist-level machine, so it costs about $2700 and the spools of print material are about $40 per 1kg spool (this is pretty cheap). The important parts of the specs are as follow:

Accuracy
Low: 340 microns (0.0133IN)
Medium: 270 microns (0.0106IN)
High: 100 microns (0.0039IN)

Build Volume
9.8IN Long x 6.3IN Wide x 5.9IN Tall
(25cm Long x 16cm Wide x 15cm Tall)

Build Platform
Machined and Anodized Aluminum
Heated
Dual Extrusion Heads
Side-by-Side Extruders allows two colors per print without pausing or swapping filament

Before Printing

1. Conceptualizing
When you are struck with an idea that you'd like to print, try and think it through several times before committing it to plastic. Make some sketches, ask some people for input, and try to picture using it in the real world. A fully fleshed out concept will save you time and money in the long run if you do as much problem solving as possible before you start modeling and printing.

2. Modeling
What software you use to model your parts is mostly up to personal preference, but there are free and not-so-free options available, with varying levels of usability. Here is a partial list of some of the more popular products:

  1. Solidworks - This is a professional-level software product, and thus has a pretty hefty price tag. It also offers far more options than are strictly necessary for designing and printing 3D parts on a hobbyist printer.
  2. Rhino is very approachable and easy to use, and supports the necessary file formats for this application. It wasn't strictly designed for making solid objects, so when modeling in Rhino you need to be sure that all your parts are not just surfaces and/or curves.
  3. Autodesk 123D - This is a free product from Autodesk that was designed specifically to allow the proliferation of 3D models for printing. It has a very simple interface, but limited capabilities.
  4. Tinkercad - A mostly free, web-based CAD program, now part of Autodesk's stable of applications. It has a very simplified interface, meant for users of all ages.
  5. Blender - This piece of software is also free and is very powerful, but it was designed by and for engineers, so there is a steep, tall learning curve. Very steep, and very tall.
  6. Autodesk Inventor - Inventor is Autodesk's commercial product design tool, and is ideal for this kind of work. Its only downside is price.
  7. SketchUp - A free piece of solid modeling software, you can make SketchUp do the job, but its minimalist interface may be too minimal, depending on the job.
File Formats
The Replicator 2X itself only understands files in .x3g format, which is the file type output by the Makerware software. Makerware will generate .x3g files from .obj, .stl, and .thing files. Using many of the above pieces of software, you will need to export your model first, and convert it to .x3g using Makerware.

Models Already Available
There are several places you can go to search for/browse printable objects that other people have already generated. The community operated by Makerbot is called The Thingiverse (www.thingiverse.com), and it is very active. Other sources include Shapeways (www.shapeways.com), 3D Marvels (www.3dmarvels.com), GrabCAD (www.grabcad.com), and Google 3D Warehouse (http://sketchup.google.com/3dwarehouse).

Makerware
The Makerbot software that imports .stl files and outputs .x3g for the printer is called Makerware. You can import multiple .stl files into the same print area in Makerware to print more than one model at a time. There are lots of options when you generate the machine-readable files, and even before that step there are a number of things you can do that can affect the object you're printing:

  1. Print Orientation Matters! - In short, how you place the part you're printing can change the finish quality, how long it takes to print, or both. Flat surfaces that are parallel to the build platform usually print just fine, but if the surface is facing the build platform it can actually disappear, resulting in a print that has gaping holes on the surface. See the image below for an example of this phenomenon. The Companion Cube was printed with the two corners at the top left on the build platform, and the flat surfaces parallel to the platform facing down all suffered as a result. The cube below was printed with supports in place, so take it as an example of the limitations supports have in helping the quality of your print.

  2. The ABS that the Replicator 2X prints with has a naturally matte finish, but the surfaces in contact with the build platform will always ben glossy. Just something to consider when striving for a uniform finish. The build platform is a hard and perfectly flat surface that limits the movement of the extruded plastic as it settles, so the bottom layer of your print will also always have sharper lines between material colors in the case of a two-color print.

  3. If your print is having trouble adhering to the build platform, Makerware has an option called "Raft" that prints a lattice of extruded ABS on the build platform, and then builds your model on top of that. Hard corners and long straight stretches of ABS sometimes start curling away from the build platform, and that curl can ruin your printed parts. Rafts are one way to fix the curling problem.

  4. Another way to help the curling problem is with Helper Discs. Helper Discs are a utility that's built into Makerware to specifically help model corners stay adhered to the build platform. They are thin, round constructs that Makerware will treat as part of the model you're actually trying to print. You add them to the virtual build area in Makerware by clicking File->Examples->Helper Discs, and then picking a size. You move the discs to the corners of your model on the build surface (moving them around the build area can lift them off of the platform if you're not careful, so always use the Move->On Platform option when you're done moving them). During the print process, the discs themselves may curl off the platform, but your model should stay flat.

  5. Makerware has an option in the print dialog to include Supports, which means that your model will print with a scaffold of ABS around it, and underneath any surfaces with space between the model and the build platform. Supports can make the difference between a usable part and a ruined print, but they also frequently lead to a lot of time spent post-processing the print to remove all signs of the scaffolds.

  6. If you are printing a part with shaped hollow channels on the inside, you may find that if the channels have 90-degree corners, your print needs Supports in order to print correctly. Taking the Supports out of a closed channel on the inside of a print can be a challenge that is somewhere between difficult and impossible, but there is a solution! Make the corners of your channels round! Gentle curves can print each layer slightly offset from the previous one without needing Supports to stay up and level.

  7. Makerware allows you to load the virtual build platform with more than one STL model, combining what might be multiple print jobs into one run. So far DataPro has had limited success with this functionality, however. It could be operator error, but we frequently get print jobs that fail about 50% in, wasting time and material.

  8. The Dual Extrusion Heads on the Replicator 2X mean that you can print in more than one color of ABS or PLA per print job. The "correct" way to use this functionality in Makerware is basically to design and export your model in two parts, import them individually into the same virtual build platform, then center them both so that they overlap correctly. You can assign each model part a specific extrusion head before exporting the .x3g file. This method makes sense, but it doesn't seem that graceful.

  9. After arranging your models on the virtual build platform, you can click the "Make" button at the top of Makerware to set your print options. There are three default profiles: Low Accuracy, Medium Accuracy, and High Accuracy. The specific options for each profile vary, but you can change them at will before exporting. The options will affect both the speed and quality of the final print, and include things like layer height, platform temperature, extrusion head temperature, extrusion speed, extrusion head movement speed, number of walls, and fill percent. DataPro has found the most success on the Medium Accuracy profile, but with the layer height changed to 0.17mm. The fill percentage determines how solid your part is, and usually for prototyping purposes somewhere between 5% and 15% is totally sufficient. Parts that need some mechanical rigidity should be printed at 50% or higher. A 100% fill will yield a completely solid part. The High Accuracy profile requires a very well calibrated build platform in order to function, but the parts that come from it look great. When you export the .x3g, you will need to get the file to a computer with an SD card reader. You can export your .x3g directly to the printer if you're connected to it via USB.

Printing

Loading and Unloading Filament Spools
The spool holders on the rear of the printer are detachable, so if the printer is in an awkward position you can simply remove the spool (after you've unloaded the filament from the extrusion head). The holders are tension-locked, so to put a spool on or remove it, you must pinch the ends of the holder together. This can be difficult and painful if your hands are too big. Enjoy!

Loading and Unloading Filament
To load or unload filament, use the panel on the front of the printer to navigate to Utilities->Change Filament. The loading and unloading processes are driven by a built-in script, so just follow the instructions on the screen.

Cleaning and Clearing the Extrusion Heads
Filament can leak out of the extrusion heads while they cool off between prints, so before you start a new job, use a shop towel to wipe and clear any hardened or loose filament. Failing to do so can easily cause a jam.

Cleaning and Clearing the Build Platform
Always wipe the build platform clear of any debris with a shop towel before you start, and make sure the clearing lines that the printer draws as the beginning of every print job have been removed. Do a visual inspection of the build platform surface to see if the area that you're about to print on is not smooth. The Kapton Tape on the platform helps prints adhere to the flat surface of the build plate, but the tape doesn't last forever.

Removing Your Print
A Spatula: Can be useful for gaining leverage on prints without damaging the Kapton tape, but it is a little too blunt and thick to effectively pry prints off the platform from the surface. The Screwdriver: We have a flat-head screwdriver that has been sharpened on a grinder to a fine tip. This is very effective for getting under parts that are stuck to the platform, but you can damage the Kapton tape, the printed part, or both, if you're not careful. Some of the damage can be mitigated by sliding a 3x5 notecard underneath the screwdriver as you pry, providing a bit of a deformable buffer between the build platform and your fulcrum.

Resetting The Printer
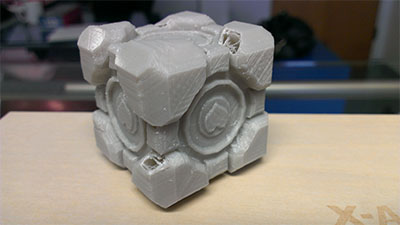
When your print is complete, wipe the build platform down again, removing debris and the clearing lines from the beginning of the print process, and clear the extrusion head nozzle you just printed with.

Finishing a Part

The X-acto Knife
Lots of prints that come off of the Replicator 2X will have burs, supports, and helper discs that need to be trimmed. The cleanest way to do that is to use an X-acto knife set. It's easy to get stuck in a perfectionist loop, trimming and rounding for hours, but this loop has several problems: First, you can over-trim a part, and there's no going back from that. Second, if you spend hours on end fixing print after print after print, pretty soon whichever hand you hold the print in is going to hate you. The X-acto knife can make your print look great if you're careful, but try to avoid the thought process that always lands you back at "If I just trim one more thing..."

Acetone
Acetone is an industrial solvent which you can use like glue to adhere (ABS) printed parts to one another. This is one of the easiest ways to print larger assemblages of parts if your whole design can't be printed as a single object on the printer. Simply don a pair of protective gloves, put on some eye protection, grab a clean paintbrush, and paint the surfaces you want to adhere to one another with acetone. Being a solvent, acetone can be dangerous to handle, and it's also highly flammable. Make a habit of using acetone outdoors to avoid the fumes wafting into a spark, flame, or heat source. Handle intelligently.

Printer Maintenance

Kapton Tape
The yellow/orange tape that helps parts adhere to the build platform is called Kapton Tape, and it can be a little tricky to apply. You will need to apply tension to the tape and smooth it onto the build platform until you have a smooth and even surface for prints to rest on. It goes on like a window decal or a cell phone screen protector. Kapton tape should be usable for quite a while, barring screwdriver-related print removal accidents. When the tape is sufficiently used up, just peel it off of the platform and throw it away. The tape on hand may not always be the correct width for the build platform, in which case you may need to apply more than one piece. Just try to keep the seam as small and smooth as possible, and everything will be fine.

Hairspray
Another way to help parts adhere to the build platform is hairspray. You can spray some on the build platform before starting a print job if you're having curling problems. A thin layer is all that's necessary, and you likely don't need to spray with every print job, as it tends to keep the platform sticky through multiple prints. Make sure you're using "Firm Hold" hairspray.

The Extrusion Heads
Make sure you keep cleaning and clearing the extrusion heads. Built up material around them can cause a filament jam or shove printed material around the platform during a print job. Don't be afraid of using a metal tool to scrape the metal extrusion nozzles. They should be brass colored, not black.

Lubrication
Every 50 hours of operation or so, the threaded rod and the X-axis idler pulley need to be lubricated with PTFE-based grease. See the Makerbot manual for more information.

Bed Calibration - Primping Ain't Easy
The build platform needs to be level relative to the extrusion heads, and also the correct distance from same. If either of these specs is outside of calibration, it will manifest in several fun ways including filament jams, print failure, and sometimes some pretty wacky extruded material. Using the front panel on the printer, go to Utilities->Level Build Plate, and follow the onscreen instructions. After completing the leveling script, it's good to run a simple print job (like one of the smaller Makerbot samples), and hand-tune the build plate distance and attitude. There are also many models available on the Thingiverse to help you with this process.

Troubleshooting and Pitfalls

Filament Jams
When an extrusion head is making a clicking sound, that means there is probably a filament jam. These jams are sometimes caused by a bad bed calibration, sometimes by material buildup around the nozzles, and sometimes by some oddity of the model you are trying to print. Determining which of the possible causes is to blame is sometimes a bit of trial and error, but it can be as simple as changing the orientation of the print on the bed. Fixing the jam itself is easily done: run the Unload Filament script in Utilities, cleanly cut the filament after pulling it out of the extrusion head, and then run the Load Filament script. Make sure you clear the nozzle before running the loading script.

Unexpected Extrusion Head Movement
If you babysit a print job, you may observe the extrusion heads executing unexpected movements based on what you know about the model you are printing. Watching the heads move up suddenly and then extruding material into thin air can be very disappointing. The most likely cause of this issue is actually your 3D model. Models must be all solid parts, not just surfaces placed near one another. You may also need to examine your model to verify that all parts are indeed in contact where they should be. If you are mixing model types, like NURBS in Rhino and a mesh that was generated by another program, look at the models carefully to make sure they overlap.

Keep An Eye on the Filament Spools
If you let a filament spool run out of material during a print job, you will need to take apart the extrusion head to extract what's left of the spool. Simply loading another spool will not push the material out. To avoid this, keep an eye on the spools and when one is getting low just remove it and throw the balance away.

Garbled Text on the Front Panel
Very occasionally the Replicator will go temporarily insane and spew garbage out onto the LCD display. Just turn the printer off and on. I'm still not sure what causes this.

Multi-Part Print Jobs
Some print jobs may fail consistently because there are multiple parts being printed. Again, I'm not sure why this is, but if you print the parts individually, the job may not fail. Just separate the parts and do them one-by-one. It could be an issue with the machine code that Makerware generated, in which case future versions may fix the issue.

Unauthorized duplication prohibited. If you wish to reproduce this article in whole or in part, please Contact us.